

HealthSync helps you securely store and organize all your medical documents in one place.
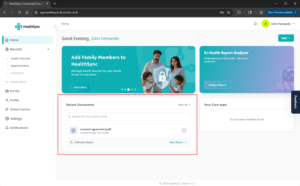
When you first create your account, the only document you will see under the Recent Documents section is the consent-agreement.pdf you signed during registration.
As you continue using HealthSync, your uploaded records will automatically appear in your health timeline.
Getting Started #
There are two ways to upload a document.
Option 1 – From the Home Dashboard #
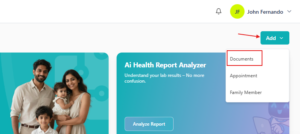
On the Home page, click the Add button at the top right and select Document.
This is the quickest way to upload a new health record.
Option 2 – From the Records Section #
Click Records from the left navigation menu.
The Health Records section stores all your medical documents and health-related information.
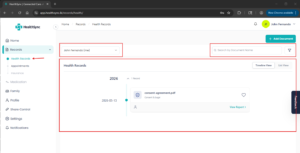
When you open the Records section, the Health Records page will be displayed automatically.
Understanding the Health Records Page #
The Health Records page helps you organize and browse your medical history.
Family Member Selector #
At the top of the page, your name is selected by default.
This dropdown allows you to switch between:
- Your own records
- Family member records
Selecting a family member will display only their documents and health information.
Search and Filter #
Use the search bar to quickly find documents by name.
You can also use the filter option to narrow down documents based on Document type, Date, Other document details etc.
Timeline View #
The center timeline displays all your documents in chronological order based on the Document Date selected during upload.
You can switch between:
- Timeline View
- List View
This allows you to browse your records in the format you prefer.
Document Viewer #
Click any document in the timeline to open and preview it on the right side of the screen.
You can also view document details and make changes later if needed.
Adding a New Document #
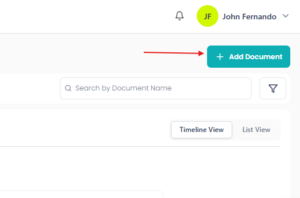
To upload a new document, click the + Add Document button at the top right of the page.
Uploading Files #
HealthSync allows you to upload documents in multiple ways.
You can:
- Drag and drop files
- Browse files from your device
- Take a photo using your device camera
You can upload:
- Up to 10 documents at once
- Maximum 10 MB per document
AI Document Detection #
After uploading a file, HealthSync AI automatically analyzes the document to determine:
- Whether the file is health-related
- The likely document type
- Whether the document supports AI analysis
If the uploaded document is a structured health document such as a lab report, the Analyze with AI button will automatically become available.
This feature helps you receive a clear and easy-to-understand interpretation of medical reports.
The AI Report Analyzer feature is explained in more detail under:
👉 AI Report Analyzer
Required Information #
Before uploading a document, you must provide the following details:
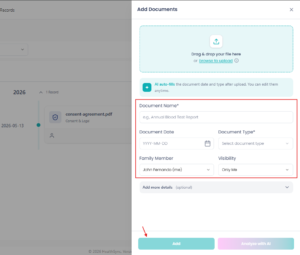
Document Name: Enter a meaningful name for the document.
Example:
- Annual Blood Test Report
- MRI Scan Report
- Prescription – May 2026
Document Type: HealthSync AI will attempt to automatically identify the document type.
If the document type is not detected correctly, manually select the correct type from the dropdown list.
Document Date: By default, today’s date is automatically selected.
You can change this to match the actual date shown on the document.
This is important because your health timeline is organized based on document dates.
Family Member Selection: Your own profile is automatically selected under the Family Member field.
If the document belongs to one of your family members, select the correct person from the dropdown list.
Managing family members is explained under:
👉 Managing Family Members
Visibility: By default, document visibility is set to Only Me.
This means:
- Only you can access the document
- Family members cannot see the document even if profile sharing is enabled
You can update visibility settings later if needed.
Add More Details (Optional) #
You can upload a document using only the required information above.
However, we strongly encourage adding additional details whenever possible.
Click Add More Details to include information such as:
- Document expiry date
- Doctor name
- Hospital or clinic
- Notes and comments
Adding more information helps you better organize and search your records later.
Save Your Document #
Once all required information is completed, click Add.
The uploaded document will:
- Appear in your health timeline
- Open in the document viewer
- Become searchable within HealthSync
To edit document details later:
- Open the document
- Click the Details tab
- Make any changes
- Click Save Changes
Uploading Documents That Are Not Yours #
You can upload documents that do not belong to you or your registered family members.
When this happens, HealthSync AI may detect that the document name does not match the selected family member profile.
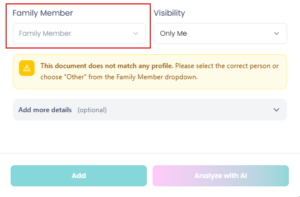
You will see a warning asking you to:
- Select the correct family member
- Or choose Other from the Family Member dropdown
Why This Is Important #
HealthSync AI uses uploaded health records to generate personalized health insights and trends.
For example:
- Lab result trends
- Health summaries
- Future AI-powered recommendations
Uploading another person’s medical records under your own profile may affect the accuracy of these insights.
Selecting the correct family member – or choosing Other – helps keep health information accurate and properly separated.


